> ## Documentation Index
> Fetch the complete documentation index at: https://upstash-partnerstash.mintlify.site/llms.txt
> Use this file to discover all available pages before exploring further.
# Upstash MCP
We provide an open source Upstash MCP to use natural language to interact with your Upstash account, e.g.:
* "Create a new Redis database in us-east-1"
* "List my databases"
* "Show all keys starting with "user:" in my users-db"
* "Create a backup"
* "Show me the throughput spikes for the last 7 days"
***
## Quickstart
### Step 1: Get your API Key
1. Go to `Account > Management API > Create API key` and create an API key.
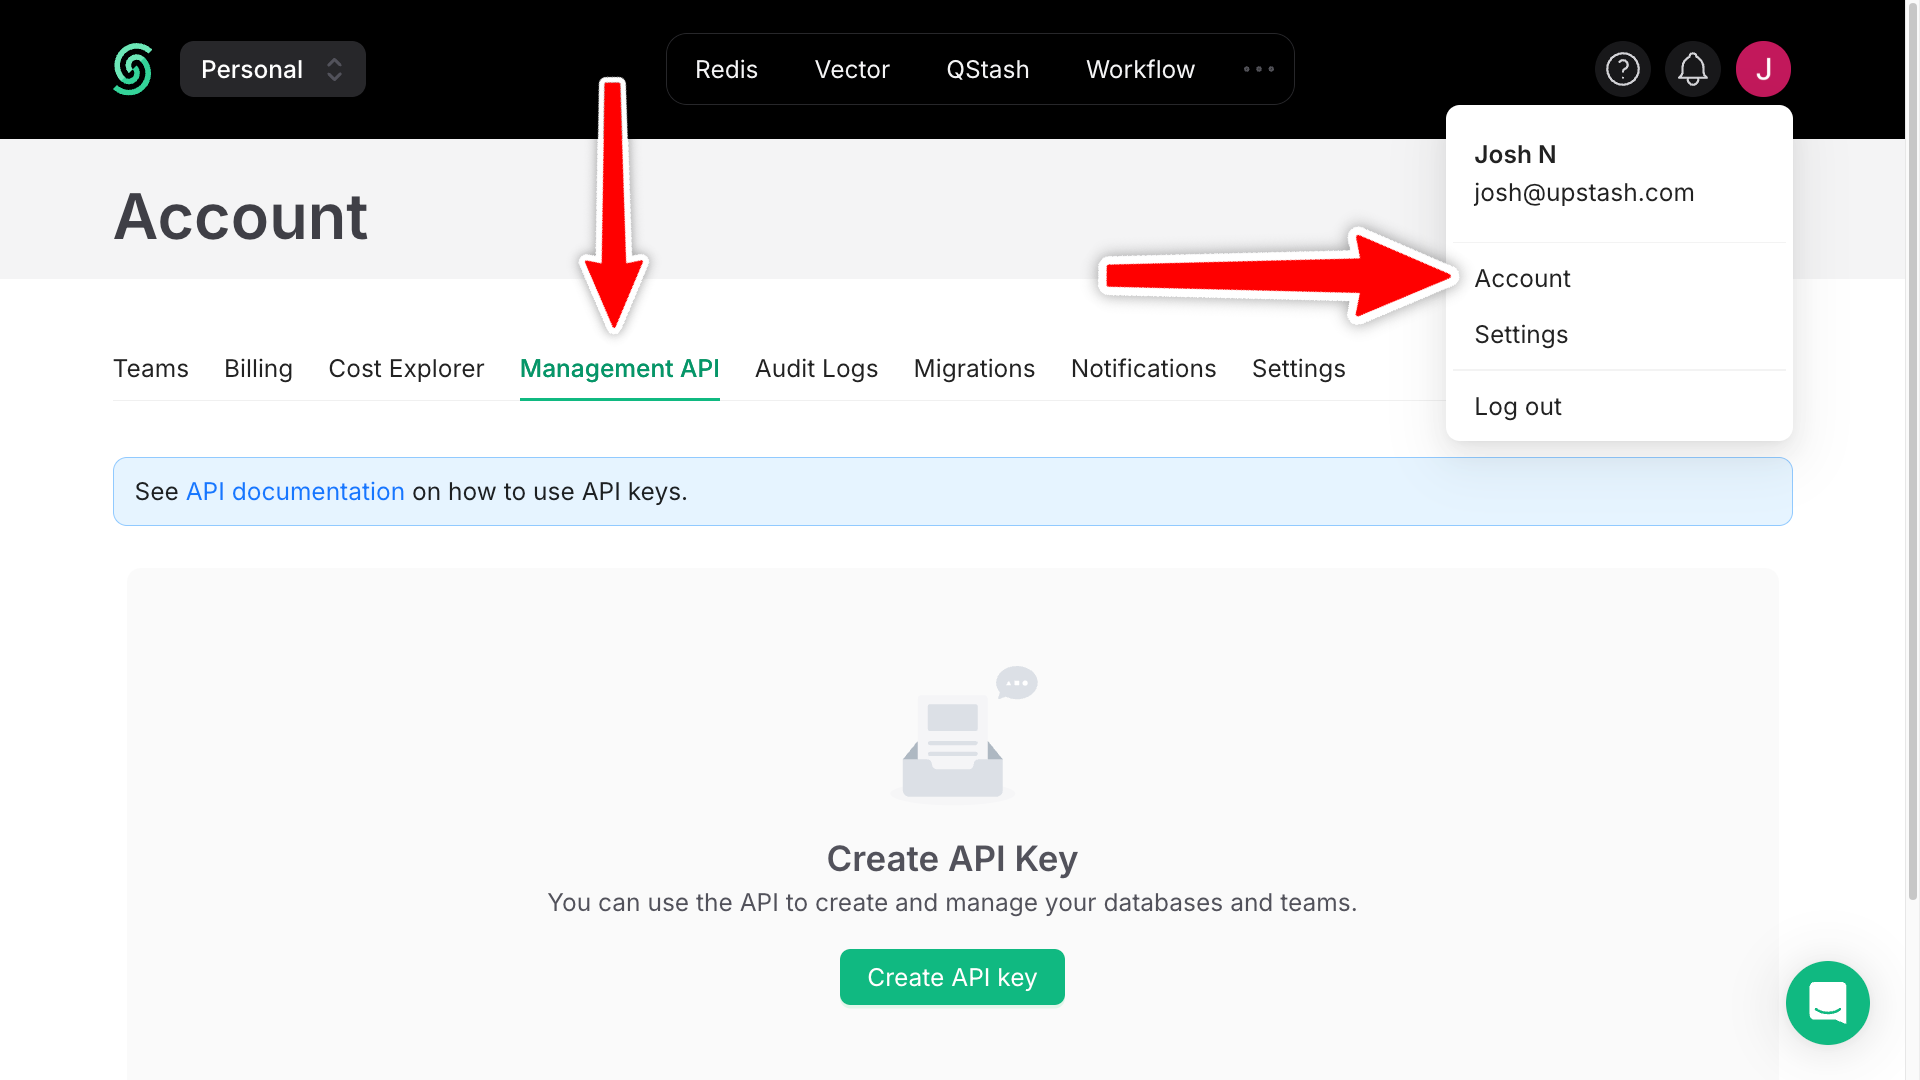 2. Note down your `` and ``.
***
### Step 2: Locate `mcp.json`
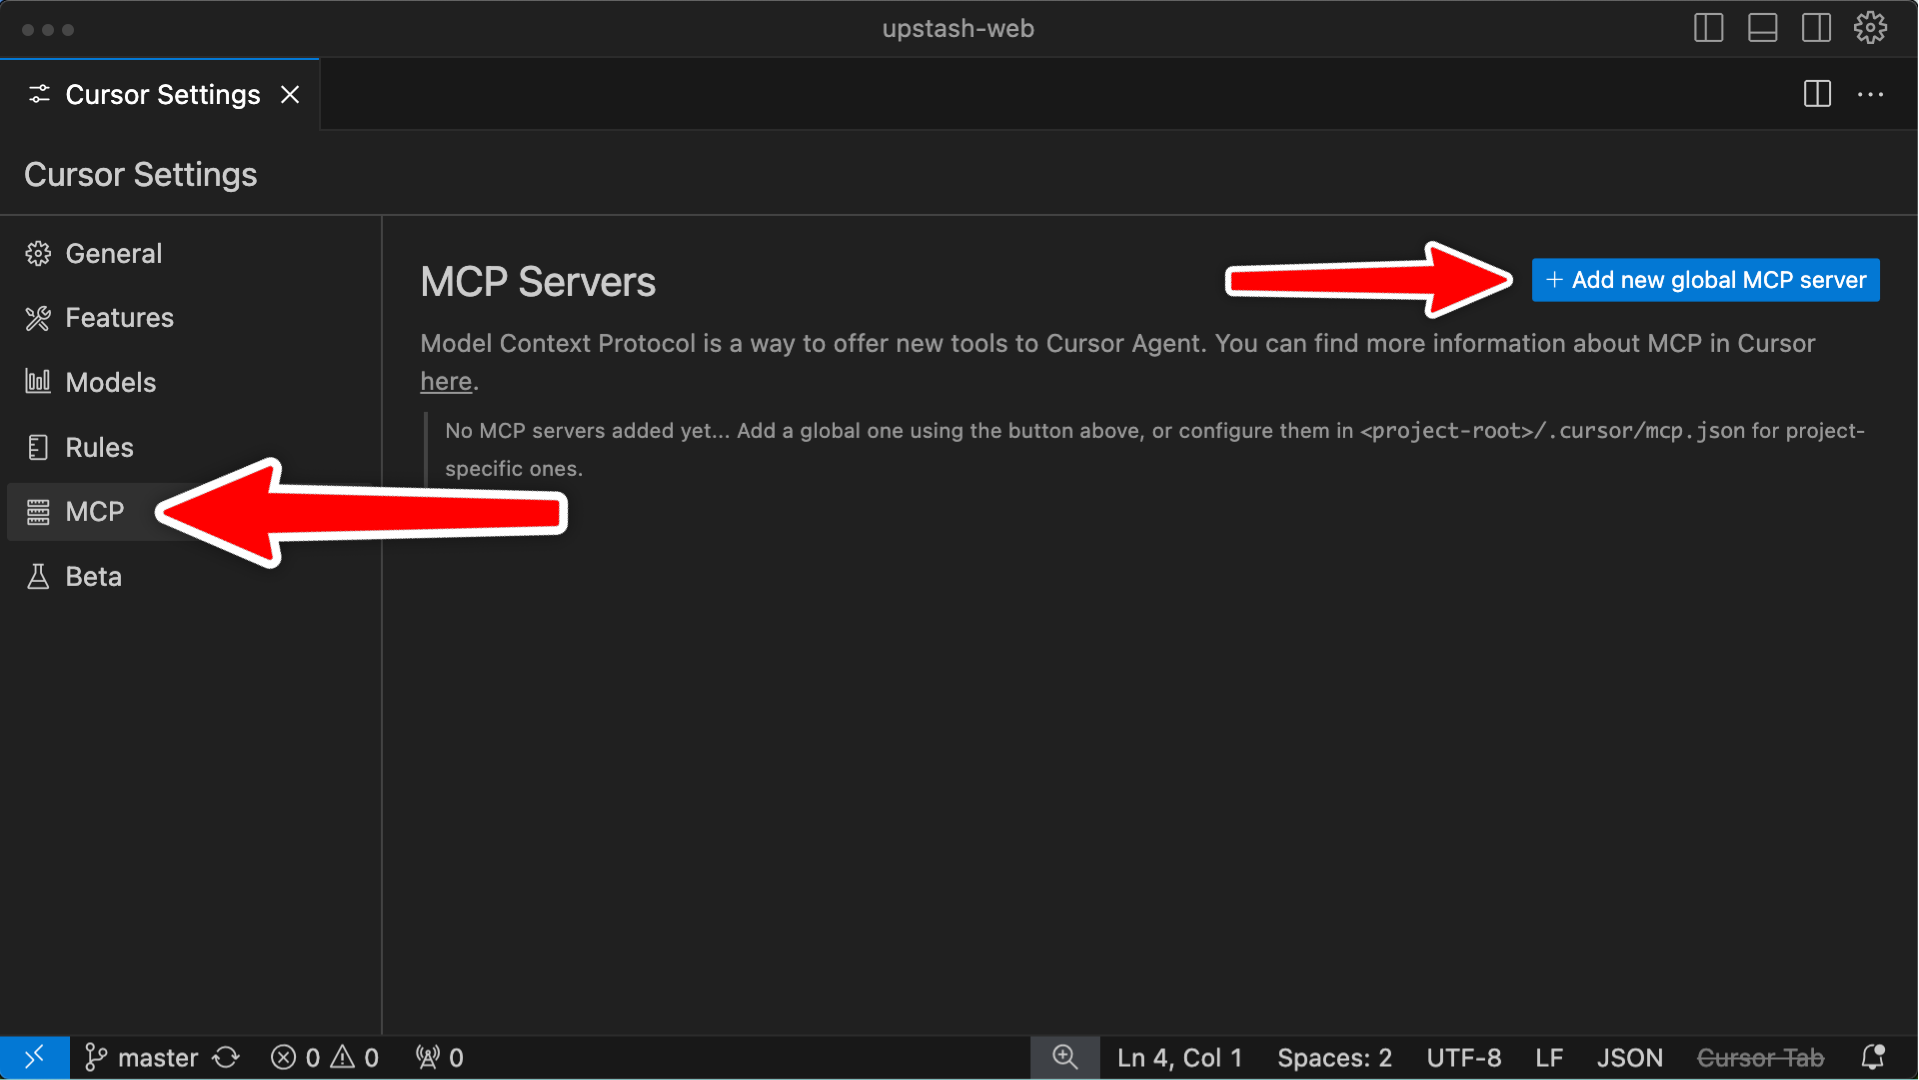
* **Cursor**: Navigate to `Cursor Settings > Features > MCP` and click `+ Add new global MCP server`. This will open the `mcp.json` file.
2. Note down your `` and ``.
***
### Step 2: Locate `mcp.json`
* **Cursor**: Navigate to `Cursor Settings > Features > MCP` and click `+ Add new global MCP server`. This will open the `mcp.json` file.
 * **Claude**: Navigate to `Settings > Developer` and click `Edit Config`. This will open the `claude_desktop_config.json` file. [Refer to the MCP documentation for more details](https://modelcontextprotocol.io/quickstart/user).
* **Copilot**: Create a `.vscode/mcp.json` file in your workspace directory. For Copilot, first update the `mcp.json` file as described in the next step on this page, then follow the [Copilot documentation (starting from step 2)](https://docs.github.com/en/copilot/customizing-copilot/extending-copilot-chat-with-mcp#configuring-mcp-servers-in-visual-studio-code) to configure MCP servers in VS Code Chat.
***
### Step 3: Configure the MCP Server
#### Claude Code CLI (Recommended with Claude)
If you're using Claude Code, the easiest way to add the Upstash MCP server is via the CLI:
```bash theme={null}
claude mcp add upstash -- npx -y @upstash/mcp-server@latest \
--email \
--api-key
```
Verify the installation:
```bash theme={null}
claude mcp list
```
To share with your team (adds to `.mcp.json` in your project):
```bash theme={null}
claude mcp add upstash --scope project -- npx -y @upstash/mcp-server@latest \
--email \
--api-key
```
#### JSON Configuration (Cursor, Claude Desktop, Copilot)
Add the following configuration to your MCP file:
```json Cursor & Claude Desktop theme={null}
{
"mcpServers": {
"upstash": {
"command": "npx",
"args": [
"-y",
"@upstash/mcp-server@latest",
"--email",
"",
"--api-key",
""
]
}
}
}
```
```json Copilot theme={null}
{
"servers": {
"upstash": {
"type": "stdio",
"command": "npx",
"args": [
"-y",
"@upstash/mcp-server@latest",
"--email",
"",
"--api-key",
""
]
}
}
}
```
***
### Step 4: Use MCP with Your Client
Once your MCP is configured, your client can now interact with the MCP server for tasks like:
* Seeding data
* Querying databases
* Creating new databases
* Managing backups
* Analyzing performance metrics
For example, you can ask your client to "add ten users to my Redis database" or "show me the throughput spikes for the last 7 days."
* **Claude**: Navigate to `Settings > Developer` and click `Edit Config`. This will open the `claude_desktop_config.json` file. [Refer to the MCP documentation for more details](https://modelcontextprotocol.io/quickstart/user).
* **Copilot**: Create a `.vscode/mcp.json` file in your workspace directory. For Copilot, first update the `mcp.json` file as described in the next step on this page, then follow the [Copilot documentation (starting from step 2)](https://docs.github.com/en/copilot/customizing-copilot/extending-copilot-chat-with-mcp#configuring-mcp-servers-in-visual-studio-code) to configure MCP servers in VS Code Chat.
***
### Step 3: Configure the MCP Server
#### Claude Code CLI (Recommended with Claude)
If you're using Claude Code, the easiest way to add the Upstash MCP server is via the CLI:
```bash theme={null}
claude mcp add upstash -- npx -y @upstash/mcp-server@latest \
--email \
--api-key
```
Verify the installation:
```bash theme={null}
claude mcp list
```
To share with your team (adds to `.mcp.json` in your project):
```bash theme={null}
claude mcp add upstash --scope project -- npx -y @upstash/mcp-server@latest \
--email \
--api-key
```
#### JSON Configuration (Cursor, Claude Desktop, Copilot)
Add the following configuration to your MCP file:
```json Cursor & Claude Desktop theme={null}
{
"mcpServers": {
"upstash": {
"command": "npx",
"args": [
"-y",
"@upstash/mcp-server@latest",
"--email",
"",
"--api-key",
""
]
}
}
}
```
```json Copilot theme={null}
{
"servers": {
"upstash": {
"type": "stdio",
"command": "npx",
"args": [
"-y",
"@upstash/mcp-server@latest",
"--email",
"",
"--api-key",
""
]
}
}
}
```
***
### Step 4: Use MCP with Your Client
Once your MCP is configured, your client can now interact with the MCP server for tasks like:
* Seeding data
* Querying databases
* Creating new databases
* Managing backups
* Analyzing performance metrics
For example, you can ask your client to "add ten users to my Redis database" or "show me the throughput spikes for the last 7 days."